This document presents to you the functionality offered by
shinyCohortBuilder package. You’ll learn here how to apply
cohortBuilder into your Shiny application and how filters
configuration affects the resulting GUI. Later on, we’ll present what
cohortBuilder features can be used in Shiny and what steps
can you make to automate cohort configuration.
shinyCohortBuilder vs. cohortBuilder
When creating cohortBuilder our main goal was to easily
allow using its features in Shiny.
With the approach taken in cohortBuilder:
- keeping Cohort objects as an R6 class,
- introduced hooks system
we were able to fully separate cohortBuilder as an
operating backend, but also enabled to implement its features to a GUI
named shinyCohortBuilder.
The rule of using cohortBuilder and
shinyCohortBuilder is simple. With
cohortBuilder you create Source and configure Cohort with
filtering steps - with shinyCohortBuilder you generate
filtering panel in Shiny based on the Cohort.
Cohort to Filtering Panel
When you configure Cohort with the filters you want to see in the
panel, use cb_ui and cb_server to place the
panel in application UI and run it’s server logic:
library(shiny)
library(cohortBuilder)
library(shinyCohortBuilder)

ui <- fluidPage(
  cb_ui("panel_id")
)

server <- function(input, output, session) {
  source_obj <- set_source(tblist(iris = iris))
  cohort_obj <- cohort(
    source_obj,
    filter("discrete", id = "species", dataset = "iris", variable = "Species"),
    filter("range", id = "petal_length", dataset = "iris", variable = "Petal.Length")
  )
  cb_server("panel_id", cohort_obj)
}

shinyApp(ui, server)
Filter vs Filter Controller
Now let’s highlight how filter parameters affect filter controller in GUI.
- Filter value as default selection.
When you precise filter value parameter (e.g. value for
“discrete” or range for range filter) the value is taken as
a initial selection in filter controller.

If you skip providing value (or set is to NA) the
initial selection is calculated automatically:
- for discrete and multi_discrete filter all the options are chosen,
- for range, date_range filters the whole available range is selected,
- for discrete_text filter all the available (comma separated) options are chosen.
- Inactive filter is collapsed.
Whenever you define filter, the one will be enrolled and ready to use by default:

If you want provide the selected filter as the optional one in Shiny,
you may set active = FALSE in filter configuration. In GUI,
the filter will be collapsed and skipped while computing Cohort
data.
From UX (and performance) perspective it’s worth to always collapse all the filters initially.
You may achieve this by setting
options("cb_active_filter" = FALSE) before you create
filters.
- Dropdown or checkbox group for discrete filter
By default, discrete filters are transformed for checkbox group input controller. When having multiple options to choose, the approach may become inconvenient.
You may switch from checkbox group to search dropdown
(shinyWidgets::virtualSelectInput) with providing
gui_input = "vs" parameter to discrete filter.
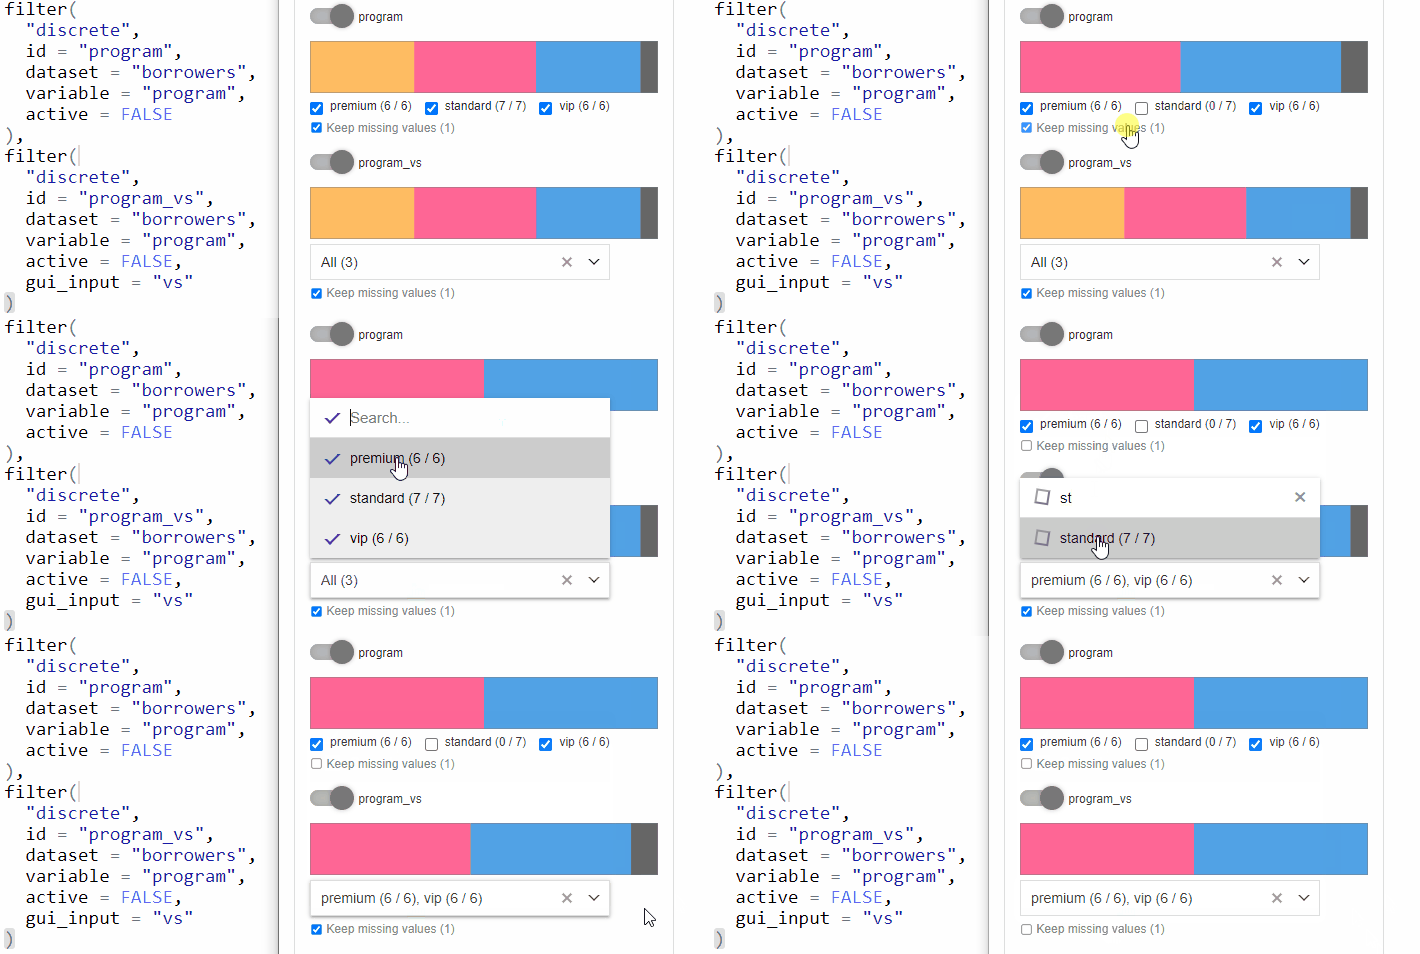
You can customize the input controller with gui_args
argument (see the next section).
- Slider or numeric input for range filter
For range filters the default input in GUI is connection of slider
and numeric range input. You can choose which input to use by providing
selected gui_input parameter:
-
gui_input = "numeric"- numeric range only, -
gui_input = "slider"- slider only, -
gui_input = c("slider", "numeric")or skipped - both options.

- Controller configuration
You can customize filter GUI controller with gui_args
argument passed to the filter. The argument stores list of parameters
that are passed to the function responsible for generating the filter
controller.
List of functions that are used for specific filter type:
-
"discrete"(default) -shiny::checkboxGroupInput -
"discrete"(gui_input = "vs") -shinyWidgets::virtualSelectInput -
"range"(gui_input = "slider") -shiny::sliderInput -
"range"(gui_input = "numeric") -shinyWidgets::numericRangeInput -
"range"(gui_input = c("slider", "numeric"), default) - arguments are passed to both functions -
"date_range"-shiny::dateRangeInput -
"multi_discrete"-shinyGizmo::pickCheckboxInput -
"discrete_text"-shinyGizmo::textArea
An example is disabling search feature and showing dropdown list at the top of it. You can achieve this with:
filter(type = "discrete", ..., gui_input = "vs", gui_args = list(search = FALSE, position = "top"))- Mapping for discrete filter options
It may happen some of the columns are storing key, not readable values to the users. In this case we’d like to replace keys with understandable labels in the input controller.
To achieve the goal you need to create the mapping function taking
keys vector as an argument and cohort and returning labels. The function
should be then added to Source while its creation using
value_mappings argument.
Then pass the function name (as a character) to
value_mapping parameter of the filter.
library(shiny)
library(cohortBuilder)
library(shinyCohortBuilder)

program_vm <- function(programs, cohort) {
  c(
    "standard" = "Standard",
    "premium" = "Premium",
    "vip" = "VIP"
  )[programs]
}

librarian_source <- set_source(
  as.tblist(librarian),
  value_mappings = list(program_vm = program_vm)
)
librarian_cohort <- cohort(
  librarian_source,
  filter(
    "discrete",
    id = "program",
    dataset = "borrowers",
    variable = "program",
    value_mapping = "program_vm",
    gui_input = "vs"
  )
)

gui(librarian_cohort)
Automatic filters configuration
If you want to skip configuring filters for all of the tables and
columns in the source, you may use
shinyCohortBuilder::autofilter method.
The method applied on Source, will scan all the columns included in Source and automatically configure proper filters to them. The filters will be stored within a Source, so it’s enough to pass such object to Cohort:
iris_source <- set_source(tblist(iris = iris)) %>%
  autofilter()
iris_cohort <- cohort(iris_source)

sum_up(iris_cohort)
#> >> Step ID: 1
#> -> Filter ID: OSNCJ1727431220830
#>    Filter Type: range
#>    Filter Parameters:
#>      dataset: iris
#>      variable: Sepal.Length
#>      range: NA
#>      keep_na: TRUE
#>      description:
#>      active: TRUE
#> -> Filter ID: RVKET1727431220830
#>    Filter Type: range
#>    Filter Parameters:
#>      dataset: iris
#>      variable: Sepal.Width
#>      range: NA
#>      keep_na: TRUE
#>      description:
#>      active: TRUE
#> -> Filter ID: NVYZE1727431220830
#>    Filter Type: range
#>    Filter Parameters:
#>      dataset: iris
#>      variable: Petal.Length
#>      range: NA
#>      keep_na: TRUE
#>      description:
#>      active: TRUE
#> -> Filter ID: SYYIC1727431220830
#>    Filter Type: range
#>    Filter Parameters:
#>      dataset: iris
#>      variable: Petal.Width
#>      range: NA
#>      keep_na: TRUE
#>      description:
#>      active: TRUE
#> -> Filter ID: HZGJI1727431220832
#>    Filter Type: discrete
#>    Filter Parameters:
#>      dataset: iris
#>      variable: Species
#>      value: NA
#>      keep_na: TRUE
#>      description:
#>      active: TRUE
The autofilter method checks column type and count of
levels to apply the proper filter:
- numeric or integer class - range filter,
- factor or character with levels count equal to column length (usually primary keys) - discrete_text filter,
- factor or character with less than 4 levels, or logical column - discrete filter with checkbox group input,
- factor or character with more than 4 levels and more - discrete filter with virtual select input.
Providing custom rules will be added in the future releases of
shinyCohortBuilder.
Note. You can use autofilter to attach
the generated filters configuration to Source as
available_filters attribute. Just use
autofilter(..., attach_as = "meta"). See Multiple-steps filters.
cohortBuilder to GUI features
Now we’re gonna highlight what features available in
cohortBuilder can be also enabled in GUI panel.
Multiple-steps filtering
Available with cb_ui(..., steps = TRUE).
The options adds Add Step button to filtering panel and
attaches Delete buttons to each filtering step. With the
functionality you can perform filtering operations in multiple
steps.
By default - newly added filtering step is replicated based on the last available step in the Cohort (with choices and statistics related to the previous step).
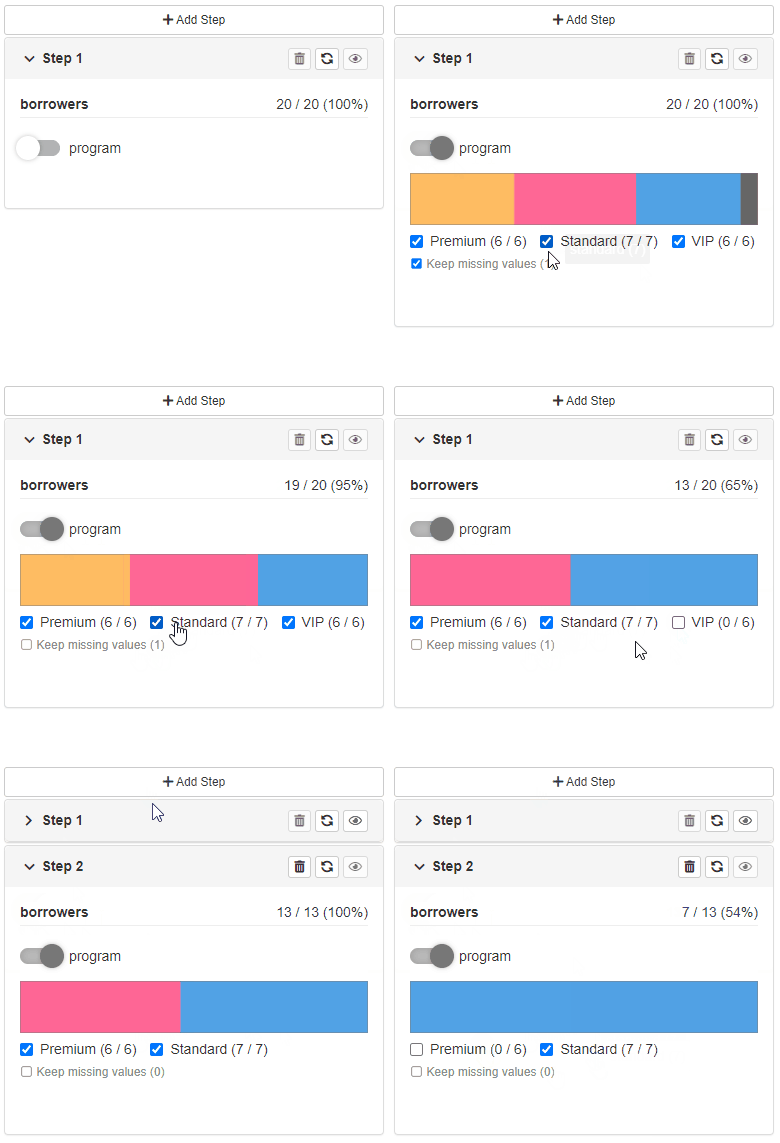
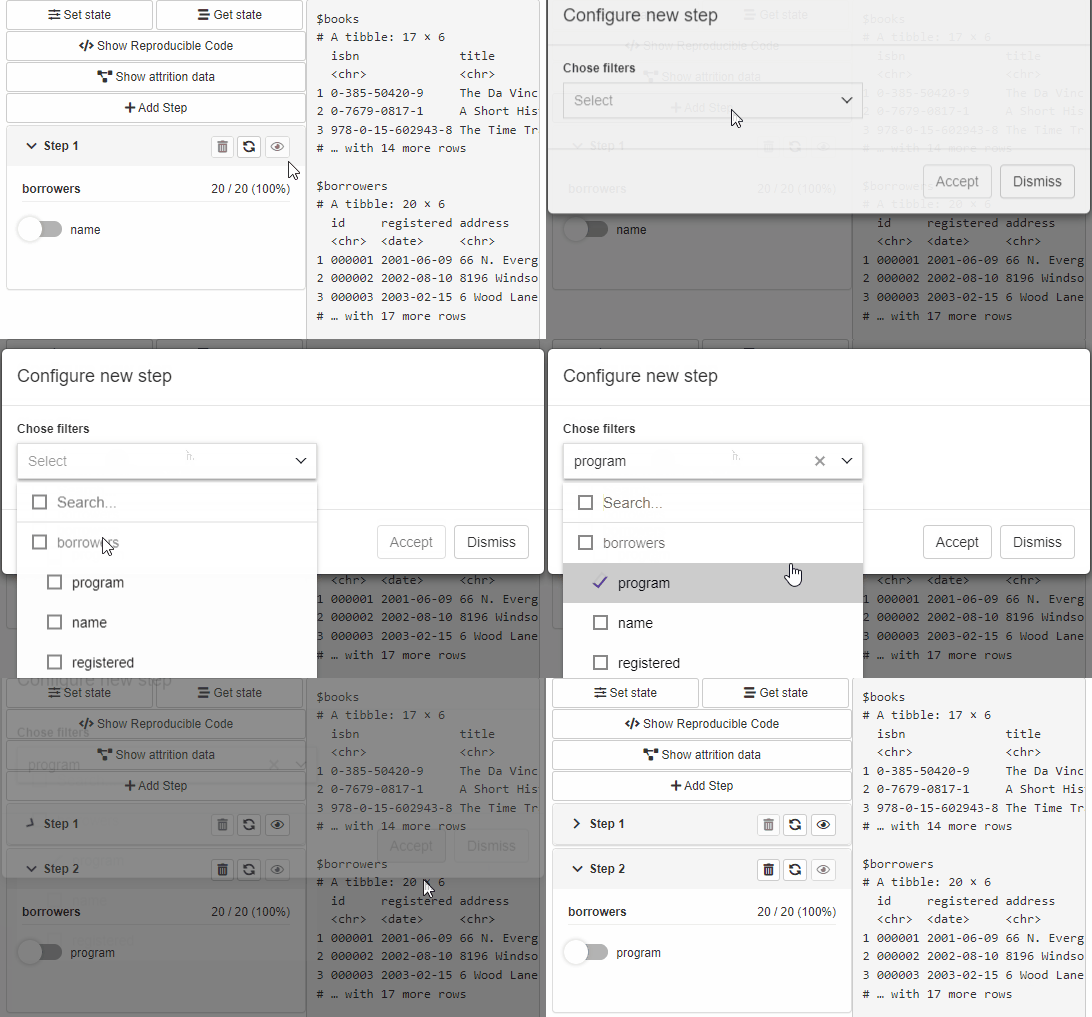
The second option allows users to configure newly added steps.
In order to enable this option:
- Attach list of available filters as
available_filtersargument while creating source:
set_source(
  ...,
  available_filters = list(
    filter("discrete", ...),
    filter("range", ...),
    ...
  )
)- Specify
cb_ui(..., new_step = "configure")orgui(..., new_step = "configure")to enable configuration panel.
The available filters can be then chosen in step configuration panel.
Reproducible code
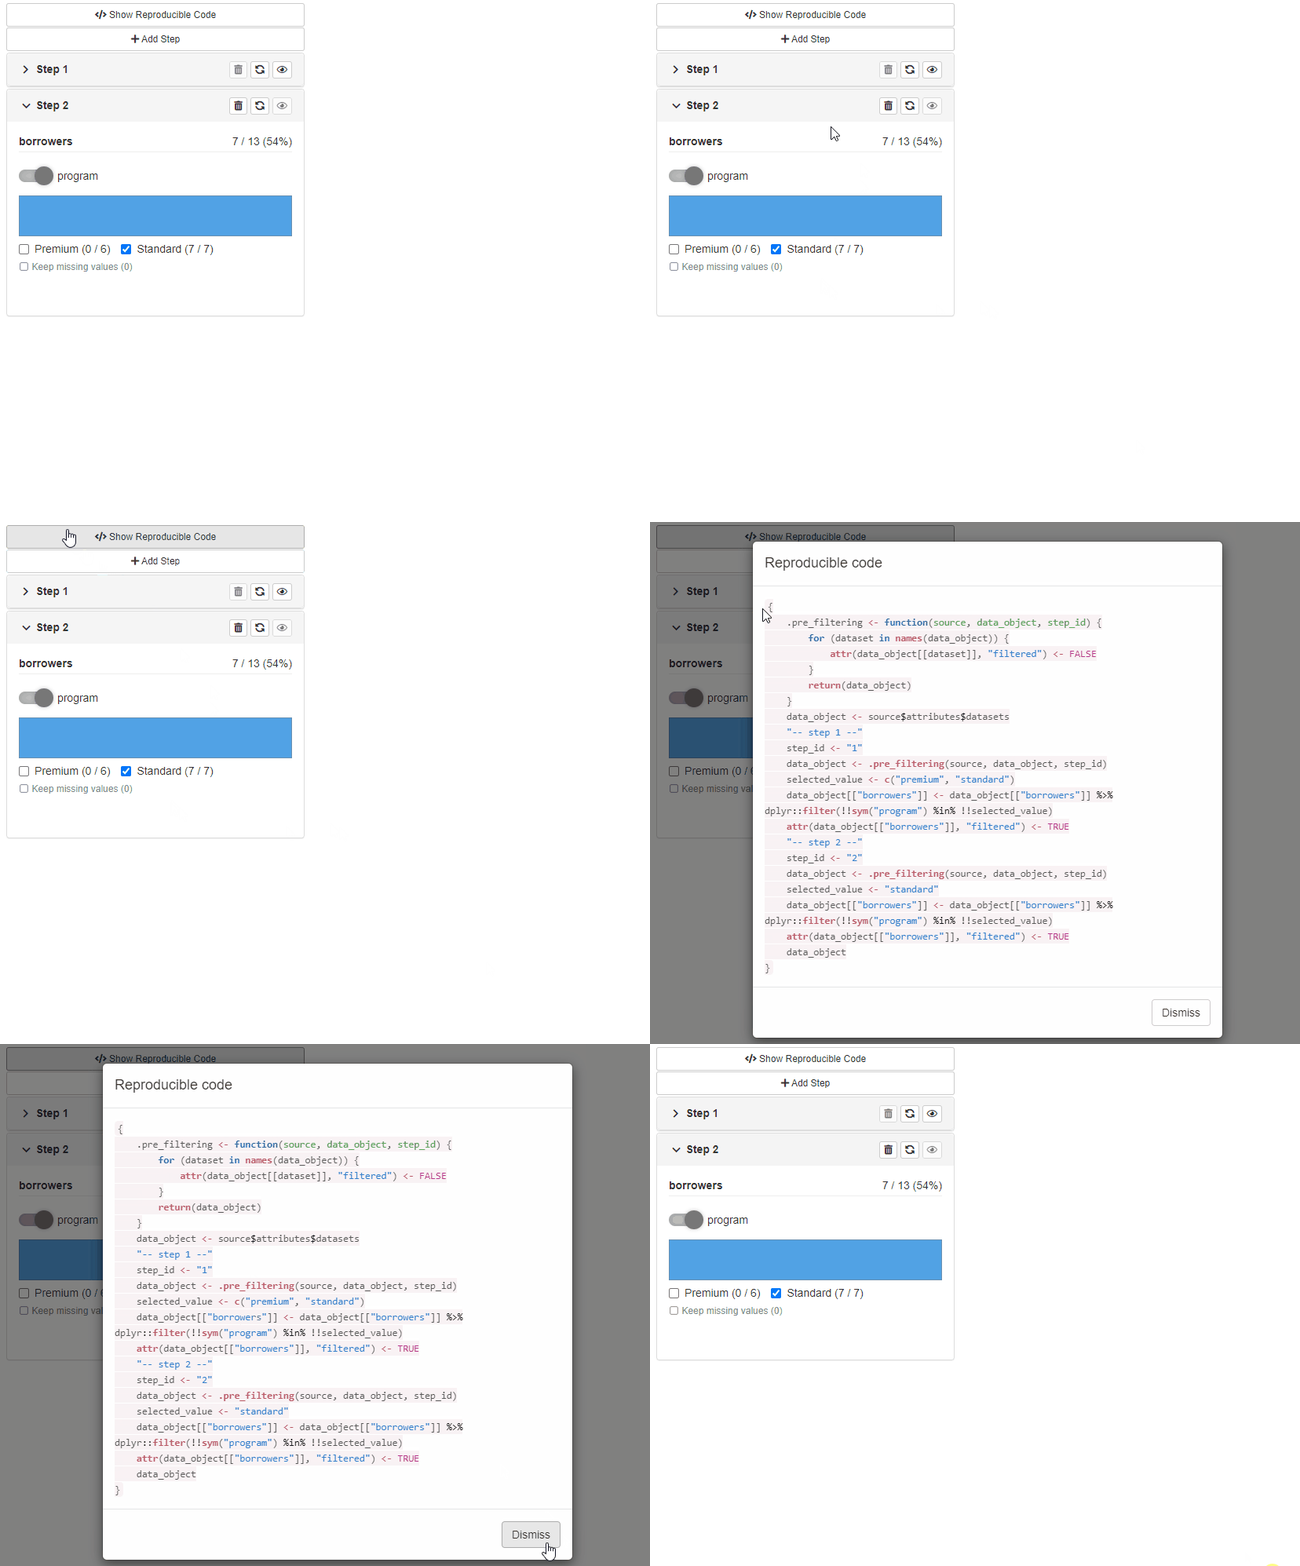
Available with cb_ui(..., code = TRUE).
The option adds Reproducible Code button to filtering
panel. When the button is clicked a modal shows up presenting
reproducible code for source data filtering.
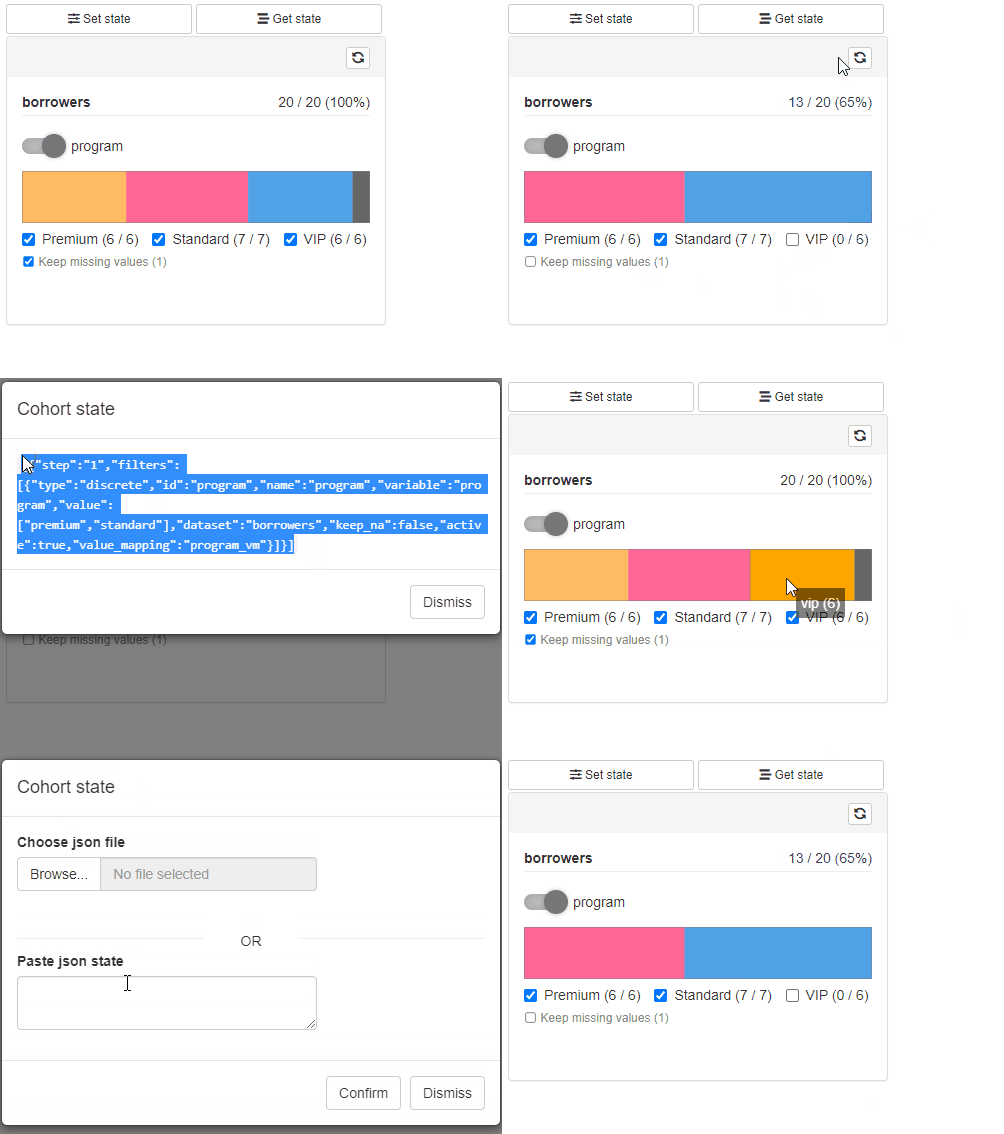
Saving and restoring Cohort state
Available with cb_ui(..., state = TRUE).
Provides Get State and Save State buttons
to the filtering panel. Get State opens a modal with Cohort
configuration state in JSON format. Such JSON state can be then used to
restore filtering panel state using Save State Button.
Display attrition plot
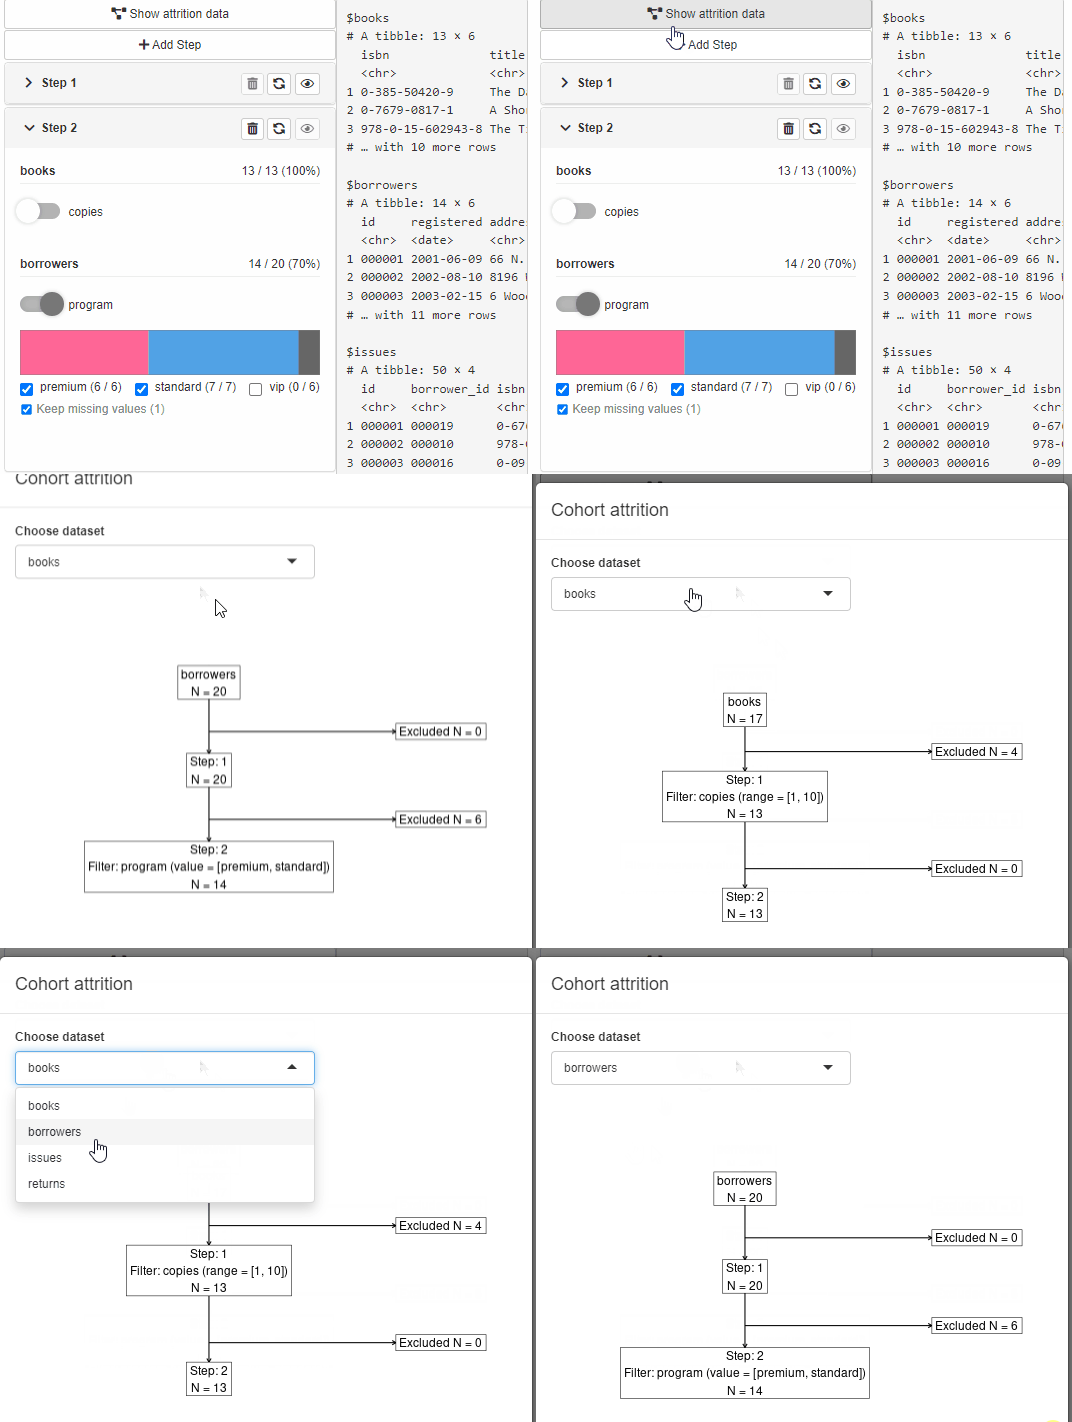
Available with cb_ui(..., attrition = TRUE).
The option adds Show Attrition button to the filtering
panel. When clicked, the modal shows data attrition plot across all the
filtering steps with a handy summary. When custom attrition is defined
(.custom_attrition method) for the used source, the modal
shows up the custom attrition plot in the modal tabset.
See more at custom gui layer.
Extra features
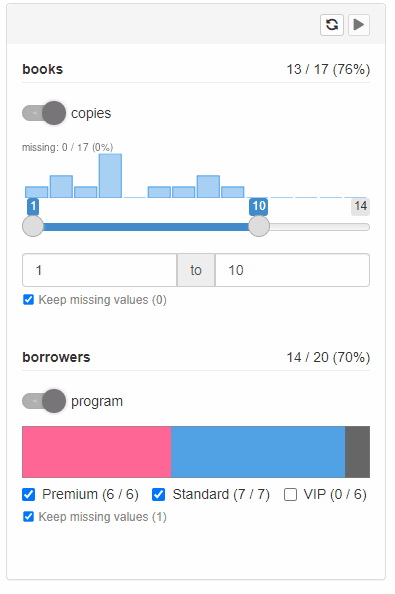
Run button
Available with cb_server(..., run_button = "local") or
cb_server(..., run_button = "global").
When the option is enabled a “play” button is displayed at each
filtering step panel (or in the top filtering panel in case of
"global" setting). More to that, no data operation will be
run until the button is clicked.
With shinyCohortBuilder each user action (changes in
filters selection) triggers data calculation with respect to selected
options. When run button is enabled, the users can specify filters setup
first and then run calculations on request.
The option is especially useful when working with large datasets or remote data connections (i.e. using “db” source with cohortBuilder.db).
Bookmarking
Available with
cb_server(..., enable_bookmarking = TRUE).
If you use bookmarking in your Shiny application this option may be especially useful. When turned on, the filtering panel is integrated with native shiny bookmarking so you can use it to restore application state along with all the application inputs (outside the filtering panel).
Visibility of data statistics
Available with
cb_server(..., stats = c("pre", "post")).
Depending on the stats parameter you may choose which
statistics should be visible in the filtering panel. There are four
options:
stats = c("pre", "post")
Results with displaying number of table rows (or other statistic implemented in source layer) before and after filtering in step. More to that shows pre and post filtering statistics for discrete filter choices (counts for each choice).
stats = "pre"
Same as above but only previous step statistics are shown.
stats = "post"
Same as above for 1. but only current step statistics are shown (after filtering).
stats = NULL
No statistics displayed at all.
